
Overview
This guide explains how to create a new workout in Instructor Pro, add exercises or building blocks, configure workout details, and publish the final workout.
Step 1: Open Workout Builder
- Log in to Instructor Pro.
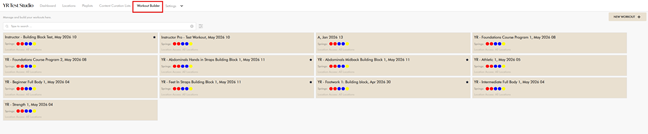
- From the dashboard, find and click Workout Builder.
Step 2: Create a New Workout
- Click the “New Workout +” button.
- In the New Workout popup:
- Enter the Workout Name.
- Select the reformer type:
- YRS – Your Reformer Studio
- YRO – Your Reformer Original
- YRE – Your Reformer Envy
Note: Choose Reformer bed as per bed at studio/gym.
Step 3: Add Exercises or Building Blocks
- Click the Add Exercise / Building Block button.
- A list of available exercises will appear on the right-hand side. Click the Building Blocks tab to view all building block options.
- Click the Add button beside the desired exercise or building block.
Step 4: Configure Exercise Details
When adding an exercise, users will be prompted to configure the following:
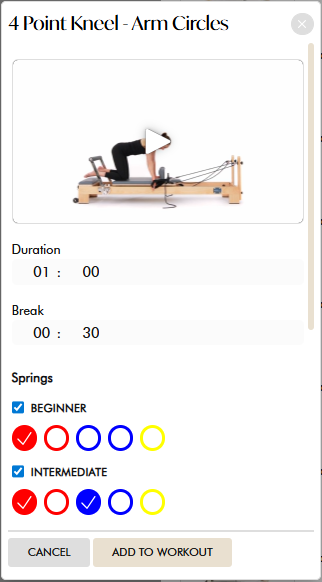
- Duration
- Break Time
- Springs
- Beginner
- Intermediate
- Advanced
- Spring Conversion
- Defaulted to Round Down
- Notes
Once all details are entered, click Add to Workout to add the exercise to the workout builder.
Step 5: Arrange Exercises
Users can organise workouts using:

- Add Above – Adds an exercise above the selected exercise block.
- Add Below – Adds an exercise below the selected exercise block.
Step 6: Edit or Delete Exercises
Edit an Exercise
- Click the Edit icon to update exercise settings or details.
Delete an Exercise
- Click the Delete icon beside the exercise to remove it from the workout.
Step 7: Delete an Entire Workout
- Click the Delete icon located at the top-right corner of the workout builder to remove the entire workout.
Step 8: Configure Workout Details
The Workout Details section allows users to:
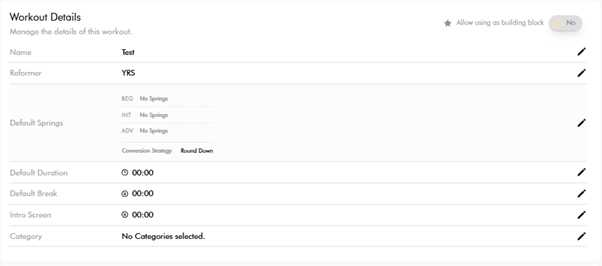
- Set Default Durations
- Speed up workout programming by automatically carrying default settings across newly added exercises
These defaults will automatically apply to exercises added afterward.
Step 9: Set Location Access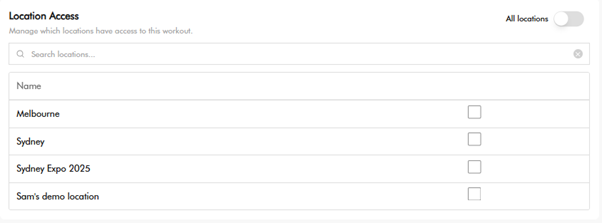
Use Location Access settings to determine which studio locations can access the created workout.
Step 10: Download Workout PDF
- Click the Download button to export the created workout as a PDF document.
Step 11: Preview and Publish
Users can:
- Click the “Eye” Icon to preview the workout using the workout preview functionality.
- Click Save and Publish to finalise and publish the workout.